Thursday, December 19, 2013

Making What I have WORK!!

Part of the stay home deal is that the budget does not allow for a new kitchen table just because the current one is looking a little worn or just because the decor needs to be updated. The wear can be sanded out and the look can be changed, it just takes a little elbow grease, as my granddaddy used to say. 

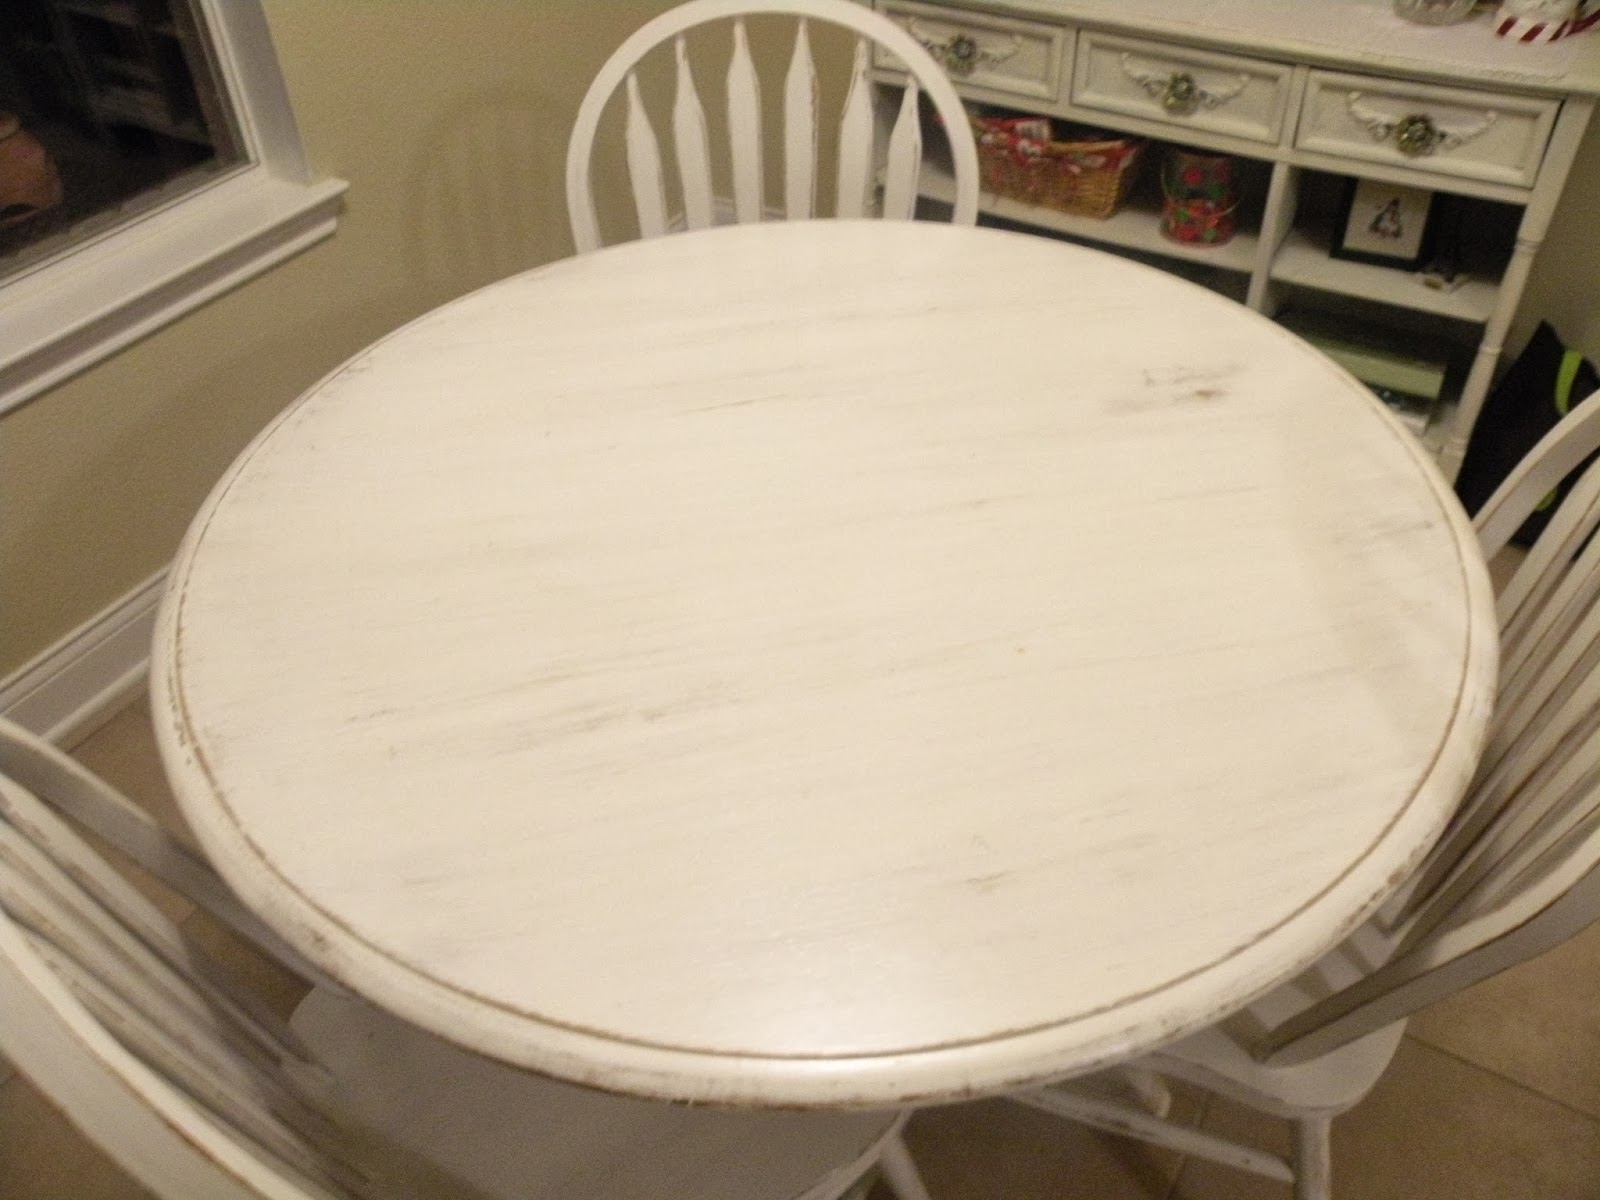
The table held up well for the 10 years of daily use, however, the finish on the top was worn through as well as some of the backs of the chairs. One of the chairs was lost due to a husband that loves the rock back at the end of the meal as we finish the conversation.  Having just the three chairs has been nice, it reminds me that our family is small and that meals at the table are important. 


  • The table and chairs were first stripped using a spray on stripper. There are precautions that should be taken when using this method, so take the time for safety in this step!
  • The table and chairs were then sanded with 60 grit coarse sand paper and wiped free of dust. This coarse sand paper was used during each step that sanding was needed. (you can see the one primed chair...it dawned on me at that point to go grab the camera!!)


  • Next, one coat of primer was painted onto all four pieces and allowed to dry for 24 hours. Letting primer and paint dry completely in between each coat is important. Try not to rush the process...it's hard, I know!
  • After allowing the primer to dry, all four pieces were lightly sanded and wiped free of dust.


  • Three coats of off-the-shelf ultra white interior eggshell paint were applied. One quart was more than enough for my table and 3 chairs. Just a regular 'ol paintbrush was used for this project. The brush strokes were visible, but this would add to the rustic/shabby chic look.
  • After each coat...let dry for 24 hours, lightly sand, and wipe free of dust.


  • Once the last of three coats of paint dried, the entire project was sanded.  Extra sanding was done on almost all the edges of each piece, the table top was roughed up as well.
  • Wipe every nook and cranny, the next step is sealing and you don't want dust under the sealer!
  • Polycrylic and 3 foam brushes were used to seal this project, using a new foam brush for each coat of sealer. The manufacturer recommended three coats, so that's what I did. Fortunately, it only needs a few hours to dry between each coat!!! Yippee!! 


My family did not think this project was ever going to end...and sometimes, neither did I!  It did finally come to an end and I LOVE the result. 


I even found a beautiful vintage tablecloth on a recent girl's trip...it has a few imperfections and therefore, released any worry of messing up a white tablecloth!

So who needs new when you have a girl with sand paper, a paint brush, and willing to use elbow grease???  I have at least 3 more pieces to refinish...the car is never gonna get back in the garage!!

Thanks for taking a look...would enjoy seeing your projects...comment and leave a pic for all of us the enjoy with you :)

Tuesday, December 17, 2013

Meatballs...It's what's for Dinner!


This is a plate full of comfort food! If your family likes meatballs, this meatball recipe will soon be the favorite. The recipe came from a dear friend of mine, and the dad and the daughter of this house love to see this meal on the monthly meal plan. This recipe makes A LOT of meatballs, so if you have a large family this recipe is a no-brainer...however, if you have a flock of three like me, you will love the recipe because it is a make once, freeze many. Leftovers make great meatball subs too :)

MEATBALLS:                              SAUCE:
3 pounds ground beef                    4 cups ketchup
1 can evaporated milk                   1 1/3 cups brown sugar
2 cups quick oats                       4 tbl Liquid smoke
1 cup chopped onion                     1 tsp garlic powder
2 tsp salt                              1 cup chopped onion
2 tsp chili powder
2 eggs
1/2 tsp garlic powder
1/2 tsp pepper


  • Mix meatball ingredients and shape into walnut size meatballs...an ice cream scooper is the perfect size. 
  • Place meatballs in two 9x13 pans. 
  • Thoroughly mix sauce ingredients. Pour sauce over meatballs and bake uncovered at 350 degrees for 1 hour. 
  • If not cooking the entire batch, place the ones you want to freeze on a lined cookie sheet. Let freeze for a few hours and then place into freezer bags...freezing on cookie sheet keeps the meatballs from sticking together when bagging them later. If freezing, the extra sauce can be equally divided into freezer bags as well.


Thursday, December 12, 2013

Pretzel Rod Treats

Pretzel rod treats are always a hit in my neck of the woods. I can't even count how many years I have been making these and giving them to friends, family, co-workers, neighbors, hair dressers, elderly church members...you get the idea. I usually spend one afternoon and make a huge batch, that way I can throw a few in a small bag or tin at a moments notice. The pretzel rods are super easy to make, just a little time consuming. So here is how I do it!

Have on hand:

  • Pretzel rods-I use Snyders brand
  • Almond Bark or Baker's Chocolate
  • Decorative sprinkles or colored sugar
  • Parchment paper
  • 2-3 Cookie sheets
The almond bark package has directions for microwaving the bark to melt, however, I have tried this method and the texture of the bark was not appealing. If you choose to microwave, I hope it works for you, it just didn't work for me. I choose to melt the bark on the stove top. Not having a double broiler on hand, I use a small sauce pan and place a Pyrex bowl over boiling water. Steam does escape around the sides of the bowl, SO BE CAREFUL if you choose this method.

  1. Place 3-4 sections in bowl to melt...this amount is easy to manage.
  2. Allow sections to melt until bark is smooth.
  3. While bark is melting, place parchment paper on cookie sheets.
  4. Coat one end of a pretzel rod with the bark. The rods were too long for the treat bag purchased, I chose to break the rod in half and cover the broken end with the bark.
  5. Place coated pretzel rod on parchment paper and continue to do so until you have a few rows.
  6. Sprinkle with decorative sugar or sprinkles of your choice. Note: IF you buy sprinkles in a tub and not a shaker,cutting ONE or TWO small holes in the protective plastic makes the container like a shaker!
  7. Once cookie sheet is full, place in freezer to speed up hardening process. Rotating two cookie sheets in and out of the freezer works for me.
  8. Remove hardened pretzel rods from cookie sheet and place into container or treat bags.
  9. Enjoy gifting them to your favorite people!


Thanks for stopping by and Happy Holiday Cooking!


Monday, December 9, 2013

Holiday Homeschool Freebies

Need or want some inspiration for keeping the kids interested this holiday season? Check out the link below for loads of freebies and ideas for learning. This week we shift into Christmas mode with some delightful(and unique)holiday stories and resources to make the season all the more meaningful for you.


Here's your lineup:


Monday, Dec 9th:
HOMESCHOOL FOR THE HOLIDAYS (PDF ebook)
Loads of practical, hands-on holiday wisdom from Homeschooling Families

Tuesday, Dec 10th:
THE FIRST NEW ENGLAND CHRISTMAS: A STORY OF LIFE IN THE COLONIES (PDF ebook)
This story of how the colonists of 1620 celebrated Christmas will surprise you!

Wednesday, Dec 11th:
THE CHRISTMAS OF 1776 (PDF ebook)
A young girl's Christmas during the American Revolution - great living history

Thursday, Dec 12th:
CHRISTMAS EVERY DAY (MP3 audiobook)
Don't miss this wonderful classic story of wishes that shouldn't come true

Friday, Dec 13th:
A CHRISTMAS CAROL (streaming video)
Amazing animation in the spirit of the original illustrations - wonderful!

-----------

All of the above resources will be available on their respective days this week at:
http://www.homeschoolfreebieoftheday.com

Sunday, December 8, 2013

Eye Mask Tutorial


This eye mask was created out of a need to block the glow of the computer screen! My sweet husband of TWENTY YEARS is a night owl and I go to bed with the chickens! However, we usually go to bed at the same time...me to sleep and he likes to watch guitar lesson videos, gardening websites and so forth. I have tried the traditional eye mask with elastic to hold in place...not comfortable. Then it came to me!!  Make an eye mask similar to the flax seed pillow that I use as a heating pad or cold pac as needed.
I used a couple of different sets of pics for the steps below... some steps were easier to get a clear photo with one fabric 
versus the other.
Pin pattern to fabric and cut 2.  I had a fat quarter that I folded in half.


Place fabric wrong sides together and pin in place...hard to see the pins, but at the top I placed one horizontal to remind me to leave an opening!
Allow about 1/2" seam allowance...remember to leave the opening for turning mask right side out!


Clip around curves, being careful to not clip into the seam.  Iron at this time to set the seam.

I use a card making tool called a bone to get the seams in curves or corners turned right side out.  Basically use a rigid object, be careful using scissors to do this...I have gone through the seam when using scissors, not good.  Iron again to get seam nice and flat. Turn in opening fabric and iron as well.

This is the point where you fill the mask...obviously, the mask in the picture is complete...forgot to take a picture during this step.  I used one cup of flax seed for this bag...I know I have a 1/2 cup in the picture-the 1 cup was MIA.


Once you have the bag filled, edgestitch around entire mask.

The mask is complete and ready to block the computer glow!!


Materials:
  • PATTERN
  • 1 fat quarter
  • thread
  • 1-1/2 cups whole flax seeds (this is usually sold in the bulk section and  at a whole foods/organic type store)


So this is my version of a flax seed eye mask. Hope you find this useful...would love to see your version. Happy sewing and creating!


Thursday, December 5, 2013

Wreath Rehab!

Along with the rest of you, or maybe a little later than some of you, I am getting the home decorated for Christmas!!!  I really enjoy decorating this time of year...makes me feel like a kid again. Santas, snowmen, jingle bells...I mean, who doesn't LOVE decorating for Christmas???


I pulled this pitiful, plain wreath out of the attic, hung it by the front door, stood back and felt sad! I actually haven't used it in a few years and now I remember why. A wreath rehab was in order!


Off to Dollar Tree I went as fast as I could. I came back with 4 tubes of Christmas balls for $4 in various shades of gold...what a deal!! Having all these ornaments on hand, I had a fleeting moment of wanting to make a wreath of just the ornaments on a hanger. I am sure you have seen some version of a tutorial and how easy this is supposed to be. I worked at it for a whole 5 minutes, gave up and grabbed the glue gun.
The Santa hanging out in the moon always has a hard time finding a place in my decor too, but I just couldn't get rid of him.  Pretty sure I have had him for 3-4 years from a gift exchange and just knew I would use him at some point...this is the time. Lots of glue on the back of him and on the wreath he went!


Hot glue was then applied to the the top of the ball and the hanger part was placed into the wreath. There is no particular method, just vary different size or color of ornament and glue them in a cluster.  I have always heard to use odd numbers when doing something of this nature, so some clusters had 3, 7, or 9 ornaments. 


Hot glue, the Santa in a moon and gold ornaments...LOVE IT!!
Grab an old wreath, some dollar store ornaments, a hot glue gun and rehab your old wreath!!


Sunday, December 1, 2013

Infinity Scarf...DIY in 5 MINUTES!!


Yes, yet another infinity scarf tutorial!!  It was SO surprisingly EASY, I had to share!! In order to make this tutorial more interesting, I'll share why I made it....you can skip this part if you so desire, but it is a really good story...


I grew up in a small East Texas town that LOVES football. The football team of the late 80's/early 90's was a force to be reckoned. Gladewater lost a football coach that had been with the district for longer than I can remember, maybe this was the beginning of the end. As with any other football program, it has it's up and downs. Sad thing is that the Gladewater Bears have had a LOOOONNNNGGG down time. 
I heard rumor that this was going to be the comeback year! The rumor was correct, the Bears are back! Luckily, the Regional Championship game was going to be 5 minutes from my home in the Dallas area...yippee...love me some high school football. 

Now what to wear???? I might see someone I know!!! School colors are orange, black and white. Got the black and white for sure...orange, not so much. I do have one burnt orange shirt, but that shirt makes me CRAZY!!!!  Light bulb moment...I can make an infinity scarf out of that shirt I hate and there you have it...black, white and orange!


This is the shirt that makes me crazy...we all have one in our closet somewhere!
Basically get it lined up and flat as you can.

Cut of the hem at the bottom of the shirt.

I could only make this scarf about 12 inches wide because of the size of the shirt to begin with. The larger the shirt, the wider you can make your scarf.  Having only 12 inches to work with made the scarf a little skinnier than I would have normally liked....but I HAD to have SOMETHING ORANGE!!

Place your foot in one end of the tube you cut from the shirt, pull with your hand and STRETCH that baby out!!
and STRETCH some more...and STRETCH some more...and STRETCH
and if your shirt has a tag in the side, cut it off ...part of the reason this shirt made me CRAZY!!

Final result!!
GLADEWATER BEARS REGIONAL CHAMPIONS 2013


The sunset was beautiful that evening too....glowing ORANGE!!!


Wednesday, October 30, 2013

Monthly Meals: November

In an effort to eat at home...aka...save money...the monthly meal plan was born. This type of planning started in June for our house. It felt really overwhelming at first, but now it is a blessing.  It only took me a few months to realize that having this plan was saving us some serious money. Before, eating out occurred for various reasons: not having anything thawed, not having all of the ingredients, we were busy that day and nothing was ready for the crock pot when we left home...you get the idea. If I was really going to master the stay-at-home role, I needed to get more organized with the big meal of the day...supper. There are multiple excellent resources on the internet and many of them plan for all three meals AND snacks! However, we are a flock of three and this felt like overkill. My daughter is 16 and big enough to make a decision on her own breakfast, lunch and needed snacks. I decided to just list breakfast and lunch suggestions at the bottom in case we stand looking into the fridge and nothing jumps in our hands...


Just start somewhere...if that means one-two weeks of meals at a time, don't compare yourself to anyone else and JUST START! In the beginning, I only shopped for the first two weeks of the plan and then returned to shop for the last two weeks of the month. At first, I also found that maybe we were not hungry for the particular meal that was scheduled and flipped it with another day later in the week. Amazing how much growth has occurred in both areas in just a few months time. Audrey helps me shop our pantry and freezer and then we prepare a grocery list for the entire month's meal plan...we have used this as part of her Home Economics course as well.  Once checking the calendar for the planned meal became a habit, I quickly realized it was much easier to just cook what had already been planned for the day. It also became apparent when shopping once a month, that I needed to  schedule meals with items that ruin faster at the beginning of the month. With a flock of three, we have a portion of the meal left over most nights. The left overs are sometimes eaten for lunch, but soups and some meat dishes have enough for us to have later in the week as well...first one to the fridge gets the favorite!!

This particular month has a lot of activity, but I decided to share it anyway!! OYO:On Your Own...I will be out of town at a retreat, so they are literally on their own...I am sure they will survive. We have a college tour planned and will not be home those days. Then THANKSGIVING is here...I think I have the meal plan for that day :) 


November
2013
Meal Plan


Sunday
Monday
Tuesday
Wednesday
Thursday
Friday
Saturday
1
2


OYO
OYO
3
4
5
6
7
8
9
Potato Soup
Beef  Stroganoff
Tacos
Left Overs
Pizza Rolls
Hawaiian Ham & Swiss Sandwiches
Tortellini Soup
10
11
12
13
14
15
16
Salmon Chowder
Mongolian Beef & Broccoli
Taco Ring
Coconut Chicken with Sweet Potatoes
Baked Potatoes
Salad
Crock Pot Pork with potatoes and carrots
Left Overs
17
18
19
20
21
22
23
LSU
LSU
Chalupas
Chicken Spaghetti
Loaded Cornbread
Peas
Salmon Patties
Potatoes and peas
Pinto Beans and cornbread
24
25
26
27
28
29
30
Pasta Fagioli
Meatballs and mashed potatoes
Left Overs
Baked Chicken with potatoes and carrots
THANKSGIVING
Veggie Night…okra, corn, carrots


Breakfast: oatmeal
                 Smoothie
                 Egg/Toast
Muffins/fruit
cereal

Lunch:  Sandwiches
             Left overs
             Salad
Burritos
Egg  rolls


I don't have the recipes linked at this time, but CHECK BACK...I will be adding those over the next couple of days. If I don't work fast enough, leave a comment and I can send it to you personally.


Here are a few tips for planning your month of meals...of course, you are welcome to copy mine!! 

  • First and foremost, plan meals that you enjoy cooking. After all, you are the cook and you deserve to enjoy the process. 
  • Plan meals that your family enjoys eating! While sitting with your family at a meal, ask what their favorite meals are and make sure to include the ones they mention.
  • Make sure to have your activity calendar close when planning. This allows you to plan a crock pot meal or a sandwich dinner for busy days.
  • Limit the amount of new recipes. I only allow one to two "new" meals per month. They are generally more time consuming because it is new to you. Some of the new meals may become a favorite, so don't hesitate to try a new recipe.
  • Make days of the week have a theme. Sunday Soup, Meaty Monday, Tuesday Mexican, Wednesday Chicken and so on. It is sometimes easier to come up with 4 soups, 4 beef dishes, 4 chicken dishes....
  • Take a quick look at the plan for the next day...may need to get meat in the fridge to thaw for tomorrow's crock pot meal.
  • Organize the pantry and the freezer. Getting organized may be a lot of work up front but lessens the frustration at cooking time.
  • Put it on the fridge or some other permanent home. I would hate for all of the time and effort go to waste because the meal list can't be found :(  There are so many cute ideas...search Meal Planning Boards in Pinterest and you will not be disappointed. Personally, I just print one from Word and put it on the fridge. Once the month is over, it gets hole punched and put in a binder. (My intention is to create a year of meals and then be able to grab the month, adjust for activities 
  • Last but NOT least, forgive yourself on the days you get off schedule. It happens. Look at the calendar the next day, make the next meal and move on...and just think, you may have ingredients for a meal in case the meat didn't get thawed :)
I hope this has inspired and helped motivate you to make a monthly meal plan!  Give it a try...you might surprise yourself.  Happy Planning and Cooking!